E2E Testing (simulated GUI)
In this chapter
- write end-to-end tests as ordinary JUnit tests
- read data from a simulated GUI and from a chart
- simulate user input and check the result in the backend
- files you touch:
frontend/src/test/java/gui/CustomerOverviewGUITest.java
Since testing is a crucial part of software development, we now want to create an end-to-end (E2E) test for our website.
In MontiGem we can do that using simulated GUIs. Those provide a way to simulate user interactions with the generated components. The resulting state changes in the underlying objects can then be verified across different contexts.
In essence this means:
- MontiGem generates components and representing Java classes from the GUI models.
- Those Java classes provide methods to simulate user interaction, e.g. clicking
a button (
registerLeftClick) or entering text (set...Entry). - Normal JUnit tests can be used to verify resulting state changes in the
underlying objects (backend and frontend) and in the simulated GUI
(
get...Value).
Unlike a browser-based end-to-end test, a simulated GUI test runs in the JVM. It needs no browser and no running server, and it is as fast as a unit test.
For a detailed explanation see the testing documentation.
The customer overview page
In the following we want to test the customer overview page. Its GUI models were part of the project from the start, because they use concepts of several chapters at once. Open http://localhost:4200/gui/CustomerOverview:
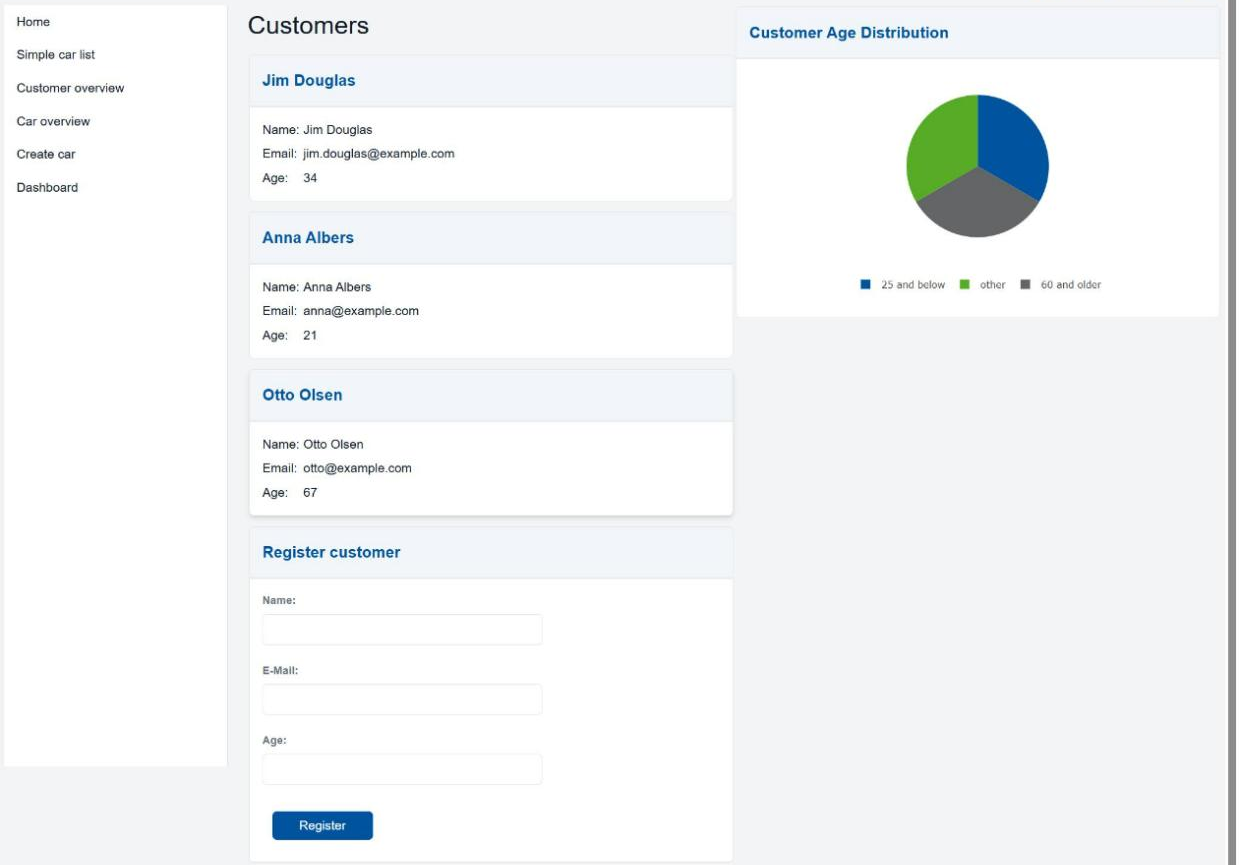
Here we can see all customers which we created in the initEntities() method of
our CarrentalServerApplication. Customers which are registered later show up
in that list as well. New customers can be registered in the card at the bottom
of the list.
To the right, we can see a pie chart showing the age distribution of all customers, divided into three categories:
- customers which are 25 years old or younger,
- customers which are older than 25 but younger than 60 (labeled as
other), - customers which are 60 years and older.
The chart updates automatically when you create a new customer. Feel free to try that out.
Creating an E2E test
An E2E test is in essence just a JUnit test like any other. In
frontend/src/test/java/gui you will find the skeleton for
CustomerOverviewGUITest:
class CustomerOverviewGUITest extends CarrentalMockTestSetup {

  public CustomerOverviewGUITest() {
    super(ClientSetup.of(1));
  }

  //...
}
Note that the Java class extends CarrentalMockTestSetup. This test setup has
been generated and should be used when a database is not required (e.g. for an
E2E test). As a result of that extension you need to specify a
ClientSetup.of(1) in the super constructor. This essentially tells the setup
that you want one client which observes the GUI components.
You will also find that this skeleton has an initEntities() method, which
provides you with some test data: the customers Alice Allison (18), Bob Banks
(62), Carla Clasen (42) and Dieter Deutz (27).
@Override
public void _init() throws Exception {
  super._init();
  initEntities();
}
Note
_init() is the hook of the generated test setup. It runs before each test
and prepares backend and clients. Call super._init() first, then create
your own test data.
The test class needs these imports:
import carrental.CarrentalManager;
import carrental.Customer;
import carrental.test_infrastructure.CarrentalMockTestSetup;
import org.junit.jupiter.api.Test;
import umlp.test_rte.ClientSetup;
import mc.fenix.charts.gempiecharttypes.GemPieChartData;
import mc.fenix.charts.gempiecharttypes.GemPieChartEntry;

import java.util.List;

import static org.junit.jupiter.api.Assertions.assertEquals;
import static org.junit.jupiter.api.Assertions.assertTrue;
Running the tests
Run the tests with:
./gradlew :frontend:test
A full ./gradlew build runs them as well. The report is written to
frontend/build/reports/tests/test/index.html.
Getting data from a GUI
As a first simple E2E test, we want to validate that our GUI component shows all
customers that have been created in the initEntities() method. Take a look at
the already existing testOverview() method:
@Test
void testOverview() {
  getClients(0).activate();

  /* ADD YOUR IMPLEMENTATION HERE:
   * - instantiate a CustomerOverview (don't forget to call init() on it!)
   * - assert that it shows all customers which are defined in initEntities()
   */
}
Note
getClients(0).activate() tells the test runtime that you want to interact
with the generated classes from the perspective of the first client (and not
the backend). You effectively perform a context switch.
In order to implement that method, we firstly want to instantiate our
CustomerOverview page, which represents the GUI component generated from
CustomerOverview.gui:
var overview = new CustomerOverview();
After instantiating a component, do not forget to call its init() method in
order to initialize it:
overview.init();
Don't forget init()!
The init() method of a page (which contains startup logic) is not
called automatically in unit tests (unlike in the running app). Always call
page.init() manually in your test setup or test method to avoid
NullPointerException or unexpected behavior.
Done! Now you can query data from the component by just calling its methods. In
order to get all shown customers, you can call the getCustomers() method:
List<Customer> customers = overview.getCustomers();
So if we want to verify that all four customers are shown, we can use the usual JUnit methods:
assertEquals(4, customers.size());
We can even go one step further and verify that the data shown is correct. If,
for example, we wanted to verify that the name of the first defined customer,
Alice, is really shown as Alice Allison, we could do something like this:
Customer alice = customers.get(0);
assertEquals("Alice Allison", overview.getNameValue(alice));
This is possible, because in CustomerOverview.gui the @GemText component
which displays the name has been labeled with name.
How the method names are built
The instance name in the GUI model determines the name of the generated accessor:
| In the GUI model | Generated method |
|---|---|
name@GemText(value = customer.name) |
getNameValue(customer) |
name@GemTextInput(entry = customer.name) |
setNameEntry(value), getNameEntry() |
register@GemButton(leftClick = ...) |
registerLeftClick(null) |
ageDistribution@GemPieChart(data = ...) |
getAgeDistributionData() |
If a method does not exist, check the spelling of the instance name in the GUI model.
Note
The customers on this page are shown in order of creation, so
customers.get(0) will always return the first customer.
Getting data from a chart
In a similar fashion to how we validate data shown in a GUI, we can also validate data shown in a chart.
On the CustomerOverview page you will have noticed the pie chart "Customer Age
Distribution". In order to access the chart's data, you, again, need to
instantiate a CustomerOverview and initialize it. You can use the existing
method testAgeDistribution() to write that test case.
@Test
void testAgeDistribution() {
  getClients(0).activate();

  /* ADD YOUR SOLUTION HERE:
   * - Instantiate a new CustomerOverview (don't forget to call init() on it!)
   * - Fetch the data of the ageDistribution chart
   * - Assert that the data matches what you would expect from the test data
   */
}
The data itself contains only the entries, so you can directly extract those:
GemPieChartData data = overview.getAgeDistributionData();
List<GemPieChartEntry> entries = data.getEntriesList();
Note
The entries are in the order in which they are shown in the chart, so "25 and below" is first, then "other" and finally "60 and older". With the test data (ages 18, 62, 42 and 27) the values are 1, 2 and 1.
You can then perform assertions on the entries' values and even labels:
// make sure that there are two customers in the 'other' category
GemPieChartEntry other = entries.get(1);
assertEquals(2, other.getValue());
Interacting with a GUI
So far we've only validated a GUI component's contents, but we have not
interacted with it yet. We want to change that, by using the GUI to register (in
other words, create) a customer. For that task, a testRegister() method
skeleton has been prepared for you.
@Test
void testRegister() {
  getClients(0).activate();

  /* ADD YOUR SOLUTION HERE:
  * - Instantiate a new CustomerCreate (don't forget to call init() on it!)
  * - Create a new customer with it
  * - Switch to the backend context (getBackend().activate())
  * - Assert that your customer can be found in CarrentalManager.getCustomerList()
  */
}
As you've learned previously, customer creation is handled by a separate GUI
component, in our case CustomerCreate. Just as above, instantiate and
initialize that component's Java representation.
The customer we want to create for this example is 'Eugene Engel':
var name = "Eugene Engel";
var email = "eugene.engel@rwth-aachen.de";
var age = 32;
Set the entries for name, email and age on the component. In the GUI model,
those input fields have been labeled, so in order to set the name, you can use
the setNameEntry() method:
customerCreate.setNameEntry(name);
Don't forget to set the other entries for email and age as well.
Note
Entries have to be set as String values. In order to set the age entry,
you have to use String.valueOf(age).
Now you can left-click the register button:
customerCreate.registerLeftClick(null);
The customer should have been created in the backend. We can validate that by switching to the backend context and retrieving all created customers. Afterwards, we check if the created user exists in that list. They should have the exact same values that we 'entered' in our GUI:
// switch to the backend context
getBackend().activate();

// check that the newly created user exists
var foundNewUser = false;
for (Customer customer : CarrentalManager.getCustomerList()) {
  if (name.equals(customer.getName())
      && email.equals(customer.getEmail())
      && age == customer.getAge()) {
    foundNewUser = true;
  }
}

assertTrue(foundNewUser, "Can not find new user!");
The age distribution should also have been updated automatically, which could be
checked in a similar manner to testAgeDistribution.
Checkpoint
./gradlew :frontend:testfinishes withBUILD SUCCESSFUL. The reportfrontend/build/reports/tests/test/index.htmlshows 3 tests and 0 failures.- Breaking an assertion on purpose (e.g. expecting 5 customers) makes the test fail, so you know the tests really run.