Updating Objects
In this chapter
- build a form that edits a domain object
- navigate to a page that shows one specific object
- reuse the form to create new objects
- files you touch:
frontend/src/main/gui/gui/CarForm.gui,CarUpdate.gui,CarCreate.gui,CarOverview.gui,frontend/src/main/java/gui/CarCreate.java,frontend/src/main/gui/gui/navigation/NavContainer.gui,frontend/build.gradle
Let's build a simple form for updating a car by creating the following new page:
package gui;

import mc.fenix.input.GemTextInput;
import mc.fenix.arrange.GemCard;
import mc.fenix.arrange.GemColumn;

import gui.navigation.NavContainer;

import Carrental.Car;

page CarUpdate(Car car) {
  @NavContainer(content = [
    @GemCard(title = "Car form", component =

      @GemColumn(width = "40ch", rowGap = "5px", components = [
        @GemTextInput(
          labelText = "Make:",
          entry = car.make
        ),
        @GemTextInput(
          labelText = "Model:",
          entry = car.model
        ),
        @GemTextInput(
          labelText = "Name:",
          entry = car.name
        )
      ])

    )
  ]);
}
The notable difference to the overview page is that we have a single car as an
input instead of a list. When the generator sees a single domain object, it
assumes that this object is somewhere in the database and generates code for
loading the object.
The result:
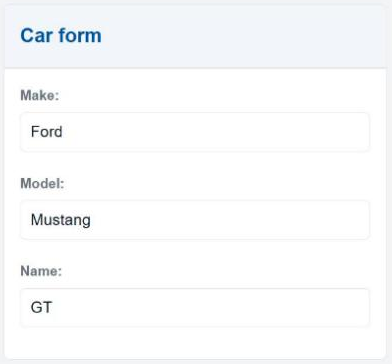
The form uses the GemTextInput component to connect attributes of car with
an input field. The entry parameter of GemTextInput has the type ?String,
which unlike a normal String indicates extended functionality:
- the value of
entryis updated when the attribute ofcaris updated (same as for a normalStringparameter). For example, ifcar.modelis changed, the value of the input field gets updated, - the attribute of
caris updated when an app user enters a new value into the input field. For example, if a user entersFiestainto the field, the value ofcar.modelbecomesFiesta.
Navigation
We have a page, but we need to navigate to it somehow. To do so we need to:
- choose a page to navigate from,
- import the page to navigate to,
- use the predefined
navigatefunction.
The page always shows a specific car, so the generator creates a URL that is
specific to a car, for example gui/CarUpdate/1, where the last segment is the
id of the car. The car object has to be specified when navigating to the page.
Note
The URL is composed of the fully qualified name of the component and the
input parameter ids: gui.CarUpdate with a car parameter results in the
URL pattern gui/CarUpdate/<car id>.
The previously defined overview page has access to all the cars, so we add a navigation button for every car:
package gui;

import mc.fenix.basic.GemButton;

import gui.CarUpdate;
/* other imports */

page CarOverview(List<Car> cars) {
  /*...*/
  @iterate(Car c : cars) {
    /*...*/
    @GemButton(label = "Update car", leftClick = navigate(@CarUpdate(car = c)));
  }
}
Note
navigate is a predefined function. You do not implement it in hand-written
code. It is the recommended way to move between pages from a GUI model. From
hand-written Java you use the generated class app.AppRouter instead, see
below.
Creating objects
We also want to be able to create a new car. The CarUpdate page basically
has all we need, except that we don't want to show an existing object, but
create a new one. Our goals:
- extract a form from
CarUpdatethat can be used for the car creation page, - use the extracted form to build the creation page.
The whole content of CarUpdate can be reused for the creation page. Note that
this is a component and not a page: it has no URL of its own, it is only
used inside other pages.
package gui;

import mc.fenix.input.GemTextInput;
import mc.fenix.arrange.GemCard;
import mc.fenix.arrange.GemColumn;

import gui.navigation.NavContainer;

import Carrental.Car;

component CarForm(Car car) {
  @NavContainer(content = [
    @GemCard(title = "Car form", component =

      @GemColumn(width = "40ch", rowGap = "5px", components = [
        @GemTextInput(
          labelText = "Make:",
          entry = car.make
        ),
        @GemTextInput(
          labelText = "Model:",
          entry = car.model
        ),
        @GemTextInput(
          labelText = "Name:",
          entry = car.name
        )
      ])

    )
  ]);
}
The resulting CarUpdate page:
package gui;

import Carrental.Car;

page CarUpdate(Car car) {
  @CarForm(car = car);
}
The creation page then looks the same:
package gui;

import Carrental.Car;

page CarCreate(Car car) {
  @CarForm(car = car);
}
For the generator to recognize that the car object doesn't exist yet, we have
to specify in the frontend/build.gradle configuration that the model is used
for object creation. The list already contains gui.CustomerCreate. Add
gui.CarCreate to it:
tasks.named("gui2java", GUI2JavaTask) {
  guiCreateModels = ["gui.CustomerCreate", "gui.CarCreate"]
}
guiCreateModels is a list of fully qualified names of models that are used for
the creation of objects.
Note
Future versions will remove that requirement.
The CarCreate page now uses a new car object instead of an existing one and
doesn't require an id to navigate to, its URL is gui/CarCreate. Add it to the
navigation bar:
@GemNavItem(title = "Create car", target = "/gui/CarCreate")
Add it to the navigation list in CustomerOverview.gui as well, as in the
previous chapter.
Saving the new object
Just putting values into input fields will not save the object, we need to
explicitly trigger the object creation. For this we add a button to the
CarForm component, injected from the CarCreate page:
component CarForm(Car car, GUIViewElement button) {
  @NavContainer(content = [
    @GemCard(title = "Car form", component =
      @GemColumn(width = "40ch", rowGap = "5px", components = [
        @GemTextInput(
          labelText = "Make:",
          entry = car.make
        ),
        @GemTextInput(
          labelText = "Model:",
          entry = car.model
        ),
        @GemTextInput(
          labelText = "Name:",
          entry = car.name
        ),
        button
      ])
    )
  ]);
}
package gui;

import mc.fenix.basic.GemButton;

import Carrental.Car;

page CarCreate(Car car) {
  @CarForm(
    car = car,
    button = @GemButton(label = "Create", leftClick = createAndNavigate(car))
  );
}
We don't want to directly add a button to CarForm, since the CarUpdate page
uses the same form, and a "create" button wouldn't make sense for that page.
Note
CarUpdate passes no button argument. A parameter that you do not pass is
null, and the form simply renders nothing at that position.
The button should save the object and navigate to the overview page. Thus, we
add the following method to the CarCreate Java class, which you need to
create, in the same folder as CarOverview.java:
package gui;

import app.AppRouter;
import carrental.Car;
import carrental.CarrentalManager;
import umlp.jsweet.extension.annotation.Component;

import java.util.function.Consumer;

@Component()
public class CarCreate extends CarCreateTOP {

  @Override
  public Consumer<Void> createAndNavigate(Car car) {
    return $ -> {
      CarrentalManager.carBuilder()
          .make(car.getMake())
          .model(car.getModel())
          .name(car.getName())
          .build();
      AppRouter.navigateToGuiCarOverview();
    };
  }
}
To save the object, we simply need to call the build method of the builder.
build() needs every attribute without a default value
build() returns an Optional that is empty if an attribute without a
default value was not set, and it does not report an error. The button would
then look as if it did nothing. make, model and name have no default,
so all three have to be set. Check the result while developing:
if (CarrentalManager.carBuilder()./* ... */.build().isEmpty()) {
  // an attribute without a default value is missing
}
That is also why the form has a field for make: without it,
car.getMake() is null and no car is created.
To be able to access the routing functionality of a web page from hand-written
code, there is the generated class app.AppRouter which contains static
navigation methods for every page.
Apply all changes:
./gradlew :frontend:generate
Checkpoint
- The navigation bar has the entries "Car overview" and "Create car".
- On the car overview, "Update car" opens
gui/CarUpdate/<id>with the values of that car filled in. Changing a value updates the overview immediately. - On
gui/CarCreate, fill in make, model and name and press "Create". The app navigates to the car overview and the new car is in the list.